執行應用程式

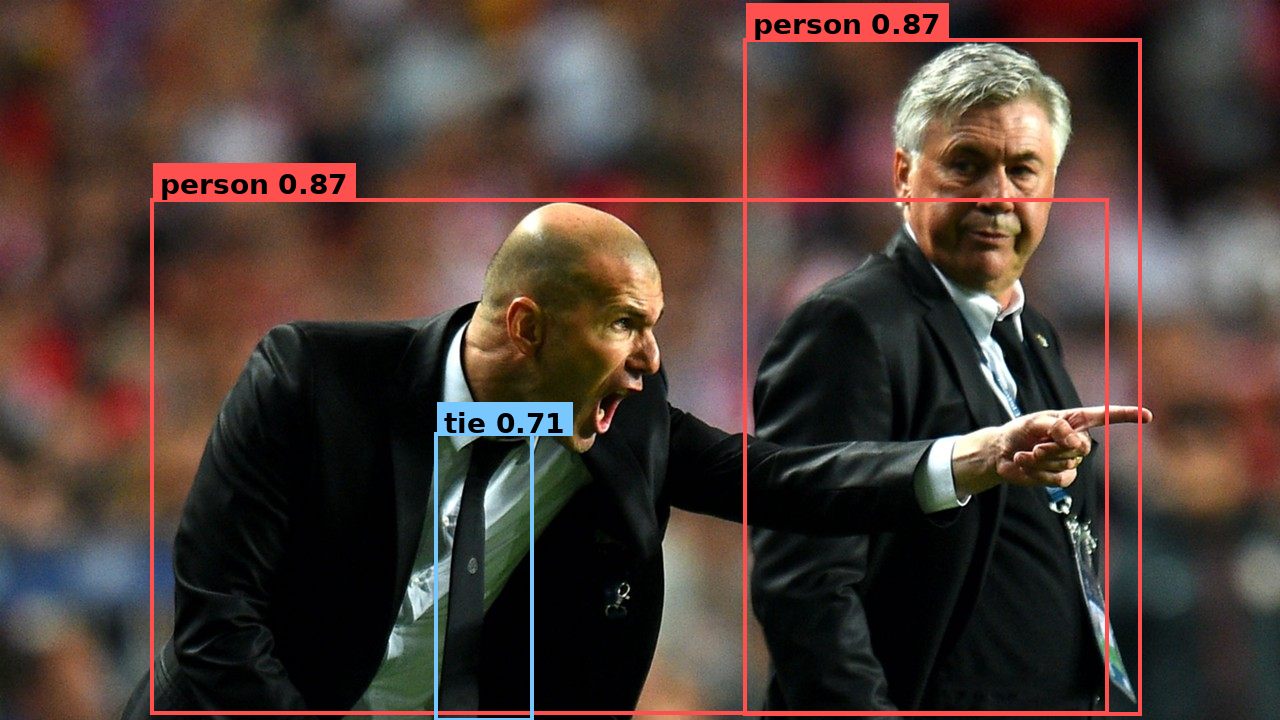
以下程式碼所產生的檢測結果,會繪製在原始影像上。
這與小型「應用程式」中的 YOLOv8 推論相同:與直接呼叫 Model.run(...)(如 執行模型 中所示)不同,您將模型組合成一個 Graph,即一個帶有輸入、模型和輸出的命名圖流程,然後建立並推送/拉取。以下程式碼以 Python 和 C++ 兩種語言呈現,請在每個程式碼區塊中選擇對應的語言標籤。
對於這個第一個應用程式,其結構刻意設計得簡單:
- 一個命名的「輸入」(
nodes.input("image"))標示資料進入應用程式的位置。 - 一個「模型」(
graph.add(model))將模型作為圖中的一個步驟執行。 - 一個命名的「輸出」(
nodes.output("detections"))標示應用程式讀取結果的位置。
相同的 API 後續可以擴展到更複雜的應用程式;這裡的目標是核心的組合模式。
在任何程式碼區塊中使用「Python / C++」選項卡——您的選擇將遵循網站範圍內的語言選擇器,因此每個程式碼片段和整個程式都會一起切換。
設定專案
-
建立一個資料夾,用於存放模型和輸入圖像:
mkdir -p assets -
下載模型:
sima-cli modelzoo -v 2.0.0 get yolo_v8ssima-cli 模型下載如果
sima-cli將模型寫入的目錄與assets目錄不同,請將該檔案複製到assets/yolo_v8s_mpk.tar.gz。 -
下載範例圖片,從檔案中下載,並將其儲存為
assets/tutorial_sample_image.png。

逐步講解程式碼
該程式由八個簡短的程式碼片段組成。切換每個程式碼片段的語言標籤。
1. 讀取圖片
#include <opencv2/opencv.hpp>

cv::Mat bgr = cv::imread("assets/tutorial_sample_image.png");
cv::Mat rgb;
cv::cvtColor(bgr, rgb, cv::COLOR_BGR2RGB);
OpenCV 讀取 BGR 格式;YOLOv8 則預期為 RGB 格式。這個步驟並非 Neat —— 您的應用程式會從檔案、相機或解碼器取得像素;Neat 將在下一個步驟中生效。
2. 描述模型選項
#include <neat.h>
namespace neat = simaai::neat;

neat::Model::Options opt;
opt.preprocess.kind   = neat::InputKind::Image;
opt.preprocess.preset = neat::NormalizePreset::COCO_YOLO;
opt.decode_type       = neat::BoxDecodeType::YoloV8;
opt.score_threshold   = 0.25f;
opt.nms_iou_threshold = 0.45f;
opt.top_k             = 100;
ModelOptions 在單一物件中宣告模型路徑:說明 Neat 如何預處理輸入像素,以及如何解碼檢測器輸出。
| 欄位 | 設定內容 |
|---|---|
preprocess.kind = Image | 輸入為原始像素,而非預先調整過的張量。 |
preprocess.preset = COCO_YOLO | 調整大小 + 填滿邊框以符合模型輸入,RGB 格式,縮放至 1/255,不進行平均值減法。 |
decode_type = YoloV8 | 檢測頭解碼器系列。 |
score_threshold / nms_iou_threshold / top_k | 置信度下限、NMS 重疊度,以及保留的最大框數。 |
3. 載入模型
neat::Model model("assets/yolo_v8s_mpk.tar.gz", opt);
Model 會讀取 .tar.gz,並根據您提供的 ModelOptions 驗證其「MPK 合約」,然後建立模型片段。目前還沒有執行任何操作。
4. 將您的影像封裝成一個 Tensor
neat::Tensor input = neat::Tensor::from_cv_mat(
    rgb,
    neat::ImageSpec::PixelFormat::RGB);
Tensor 是 Neat 的類型化資料容器——包含形狀、資料類型、佈局,以及框架需要用來解讀位元組的像素格式。必須傳遞 PixelFormat,這樣 Neat 才能知道佈局,而不僅僅是位元組。
5. 組合圖
neat::Graph graph("hello_neat_app");
graph.add(neat::nodes::Input("image"));
graph.add(model);
graph.add(neat::nodes::Output("detections"));
一個 Graph 是應用程式流程。每個 add(...) 都會附加下一個步驟,因此這會建立線性流程 image → model → detections。來自步驟 3 的模型片段會變成其中的一個步驟。
6. 建立並執行圖
neat::Run run = graph.build();
run.push("image", neat::TensorList{input});
run.close_input();
neat::TensorList outputs = run.pull_tensors("detections", /*timeout_ms=*/2000);
run.close();
build() 將公開的圖轉換為單一可執行的執行階段圖,同時保留您的節點名稱。然後,您將輸入 push 到具名輸入中,當不再有輸入時,呼叫 close_input(),並從具名輸出中以逾時方式 pull 結果。pull_tensors 會傳回一個 TensorList,其形狀與 Model.run 會產生的形狀相同——這裡是封裝後的 YOLOv8 BBOX 輸出。
7. 解碼框
neat::TensorList decoded = neat::decode_bbox(outputs);
decode_bbox 是一個 TensorList → TensorList 轉換,位置為 1:1。每個解碼後的輸出都是一個 float32 張量,其形狀為 [num_detections, 6],欄位為 (x1, y1, x2, y2, score, class_id)。
8. 讀取框選區域
const neat::Tensor& boxes = decoded.front();      // [num_detections, 6] float32
auto m = boxes.map_read();
const float* d = static_cast<const float*>(m.data);
for (int64_t i = 0; i < boxes.shape[0]; ++i) {
  const float* r = d + i * 6;                     // x1 y1 x2 y2 score class_id
  const int cls = static_cast<int>(r[5]);
  const char* name = (cls == 0) ? "person" : (cls == 27) ? "tie" : "?";
  std::printf("%-8s %.2f  [%4.0f %4.0f %4.0f %4.0f]\n", name, r[4], r[0], r[1], r[2], r[3]);
}
在 Python 中,解碼後的張量會被讀取為一個 [N, 6] 透過 NumPy 陣列 to_numpy(). 在 C++ 中,您會對應張量並讀取浮點數。模型會輸出 COCO 類別 ID;將它們對應到顯示名稱則由應用程式來處理。
完整程式
在您的專案目錄中建立檔案,然後編譯並執行。
建立 CMakeLists.txt 和 main.cpp:
cmake_minimum_required(VERSION 3.16)
project(sima_neat_app LANGUAGES CXX)

set(CMAKE_CXX_STANDARD 20)
set(CMAKE_CXX_STANDARD_REQUIRED ON)
set(CMAKE_CXX_EXTENSIONS OFF)

# Supports both DevKit/native installs (system paths) and
# cross builds with SYSROOT exported (SDK sysroot paths).
if(DEFINED ENV{SYSROOT} AND NOT "$ENV{SYSROOT}" STREQUAL "")
  list(APPEND CMAKE_PREFIX_PATH
    "$ENV{SYSROOT}/usr"
    "$ENV{SYSROOT}/usr/lib"
    "$ENV{SYSROOT}/usr/lib/aarch64-linux-gnu"
  )
endif()

find_package(SimaNeat REQUIRED CONFIG)
find_package(PkgConfig REQUIRED)
pkg_check_modules(OPENCV REQUIRED IMPORTED_TARGET opencv4)

add_executable(sima_neat_app main.cpp)
target_link_libraries(sima_neat_app
  PRIVATE
    SimaNeat::sima_neat
    PkgConfig::OPENCV
)
這兩行標記的程式碼是將您的應用程式與 Neat 連結的方式:find_package(SimaNeat REQUIRED CONFIG) 會找到已安裝的 Neat 套件(透過 SimaNeatConfig.cmake),而 target_link_libraries(sima_neat_app PRIVATE SimaNeat::sima_neat ...) 會將其連結起來——匯入的 SimaNeat::sima_neat 目標會自動傳播 Neat 的包含目錄和遞迴依賴項,因此不需要手動指定包含/程式庫路徑。(PkgConfig::OPENCV 僅在應用程式使用 OpenCV 載入圖像時才需要。)
#include "neat.h"

#include <opencv2/imgcodecs.hpp>
#include <opencv2/imgproc.hpp>

#include <cstdint>
#include <cstdio>
#include <stdexcept>

namespace neat = simaai::neat;

neat::Model::Options yolo_model_options() {
  neat::Model::Options opt;
  opt.preprocess.kind   = neat::InputKind::Image;
  opt.preprocess.preset = neat::NormalizePreset::COCO_YOLO;
  opt.decode_type       = neat::BoxDecodeType::YoloV8;
  opt.score_threshold   = 0.25f;
  opt.nms_iou_threshold = 0.45f;
  opt.top_k             = 100;
  return opt;
}

int main() {
  cv::Mat bgr = cv::imread("assets/tutorial_sample_image.png");
  if (bgr.empty())
    throw std::runtime_error("failed to read assets/tutorial_sample_image.png");
  cv::Mat rgb;
  cv::cvtColor(bgr, rgb, cv::COLOR_BGR2RGB);

  neat::Model model("assets/yolo_v8s_mpk.tar.gz", yolo_model_options());
  neat::Tensor input = neat::Tensor::from_cv_mat(
      rgb,
      neat::ImageSpec::PixelFormat::RGB);

  // Compose the model into a Graph application: image -> model -> detections.
  neat::Graph graph("hello_neat_app");
  graph.add(neat::nodes::Input("image"));
  graph.add(model);
  graph.add(neat::nodes::Output("detections"));

  // Build the app, push the image into the named input, pull the named output.
  neat::Run run = graph.build();
  run.push("image", neat::TensorList{input});
  run.close_input();
  neat::TensorList outputs = run.pull_tensors("detections", /*timeout_ms=*/2000);
  run.close();

  neat::TensorList decoded = neat::decode_bbox(outputs);
  const neat::Tensor& boxes = decoded.front();      // [num_detections, 6] float32
  auto m = boxes.map_read();
  const float* d = static_cast<const float*>(m.data);
  for (int64_t i = 0; i < boxes.shape[0]; ++i) {
    const float* r = d + i * 6;                     // x1 y1 x2 y2 score class_id
    const int cls = static_cast<int>(r[5]);
    const char* name = (cls == 0) ? "person" : (cls == 27) ? "tie" : "?";
    std::printf("%-8s %.2f  [%4.0f %4.0f %4.0f %4.0f]\n", name, r[4], r[0], r[1], r[2], r[3]);
  }
  std::printf("[OK] Graph app completed\n");
  return 0;
}
建構:
cmake -S . -B build -DCMAKE_BUILD_TYPE=Release
cmake --build build -j
執行:
- 在 DevKit 上
./build/sima_neat_app
- 在 Neat SDK 主機上
dk build/sima_neat_app
您應該會看到每次檢測結果都顯示在一行上,然後:
[OK] Graph app completed
Neat 整合了哪些內容

這些 API 直接對應到該結構:
Graph包含應用程式流程;graph.add(...)依序附加每個步驟。- 具命名的輸入和輸出會成為執行階段端點:
run.push("image", ...)和run.pull_tensors("detections")。 Model是與您直接使用Model.run呼叫的相同片段;在這裡,它作為應用程式內的一個節點執行。
後續步驟
若要深入了解圖的組裝方式,請繼續閱讀 Graph 程式設計模型。
從那裡開始,繼續使用更廣泛的 SiMa.ai Neat 學習資源:
- 學習 核心程式設計模型,它解釋了主要 Neat 概念,例如模型、圖和執行。
- 按照 教學指南,逐步了解特定的概念和工作流程。
- 探索 應用程式入口網站 上的精選應用程式,其原始程式碼位於 GitHub 上的應用程式儲存庫。