Run an App

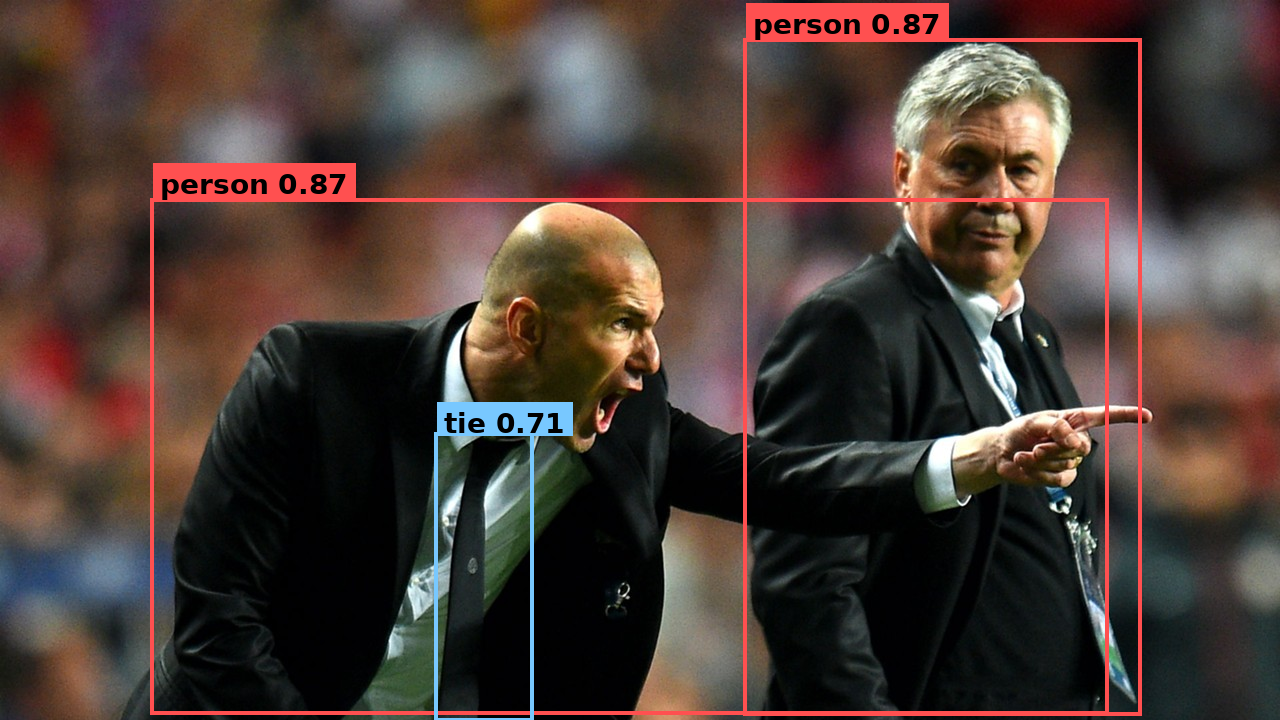
Detections written by the program below, drawn on the source image.
This is the same YOLOv8 inference as a small application: instead of calling Model.run(...) directly (as in Run a Model), you compose the model into a Graph — a named pipeline with an input, the model, and an output — then build it and push/pull. Same program in Python and C++; pick a language tab on each code block.
For this first app the shape is intentionally simple:
- A named input (
nodes.input("image")) marks where data enters the app. - A model (
graph.add(model)) runs the model as one step in the pipeline. - A named output (
nodes.output("detections")) marks where your application reads the result.
The same API scales to much more complex applications later; here the goal is the core composition pattern.
Use the Python / C++ tabs on any code block — your choice follows the site-wide language selector, so every snippet and the full program switch together.
Set up the project
You can skip this section — it uses the same assets/ directory, model package, and sample image. Jump straight to Walk through the code.
-
Create an assets directory for the model and the input image:
mkdir -p assets -
Download the model:
sima-cli modelzoo -v 2.0.0 get yolo_v8ssima-cli model downloadIf
sima-cliwrites the model somewhere other than theassetsdirectory, copy that file intoassets/yolo_v8s_mpk.tar.gz. -
Download the sample image from the docs and save it as
assets/tutorial_sample_image.png.
Walk through the code
The program is eight short pieces. Switch the language tab on each block.
1. Read the image
#include <opencv2/opencv.hpp>

cv::Mat bgr = cv::imread("assets/tutorial_sample_image.png");
cv::Mat rgb;
cv::cvtColor(bgr, rgb, cv::COLOR_BGR2RGB);
OpenCV reads BGR; YOLOv8 expects RGB. This step is not Neat — your application gets pixels from a file, camera, or decoder; Neat enters at the next step.
2. Describe the pipeline
#include <neat.h>
namespace neat = simaai::neat;

neat::Model::Options opt;
opt.preprocess.kind   = neat::InputKind::Image;
opt.preprocess.preset = neat::NormalizePreset::COCO_YOLO;
opt.decode_type       = neat::BoxDecodeType::YoloV8;
opt.score_threshold   = 0.25f;
opt.nms_iou_threshold = 0.45f;
opt.top_k             = 100;
ModelOptions declares the whole shape of the model pipeline in one object — how the input is preprocessed and how the detector output is decoded.
| Field | What it sets |
|---|---|
preprocess.kind = Image | Input is raw pixels, not a pre-shaped tensor. |
preprocess.preset = COCO_YOLO | Resize + letterbox to model input, RGB, scale by 1/255, no mean subtraction. |
decode_type = YoloV8 | Detection-head decoder family. |
score_threshold / nms_iou_threshold / top_k | Confidence floor, NMS overlap, and max boxes kept. |
3. Load the model
neat::Model model("assets/yolo_v8s_mpk.tar.gz", opt);
Model reads the .tar.gz, validates its MPK contract against the ModelOptions you passed, and instantiates the model fragment. Nothing has run yet.
4. Wrap your image as a Tensor
neat::Tensor input = neat::from_cv_mat(rgb, neat::ImageSpec::PixelFormat::RGB);
Tensor is Neat's typed data container — shape, dtype, layout, and the pixel format the framework needs to interpret the bytes. Passing the PixelFormat is required so Neat knows the layout, not just the bytes.
5. Compose the Graph
neat::Graph graph("hello_neat_app");
graph.add(neat::nodes::Input("image"));
graph.add(model);
graph.add(neat::nodes::Output("detections"));
A Graph is the application pipeline. Each add(...) appends the next step, so this builds the linear flow image → model → detections. The model fragment from step 3 becomes one step inside it.
6. Build and run the Graph
neat::Run run = graph.build();
run.push("image", neat::TensorList{input});
neat::TensorList outputs = run.pull_tensors("detections");
build() lowers the public graph into one executable runtime graph, preserving your node names. You then push inputs into named inputs and pull results from named outputs. pull_tensors returns a TensorList — the same shape Model.run would have produced — here the packed YOLOv8 BBOX output.
7. Decode the boxes
neat::TensorList decoded = neat::decode_bbox(outputs);
decode_bbox is a TensorList → TensorList transform, positional 1:1. Each decoded output is a float32 tensor of shape [num_detections, 6] with columns (x1, y1, x2, y2, score, class_id).
8. Read the boxes
const neat::Tensor& boxes = decoded.front();      // [num_detections, 6] float32
auto m = boxes.storage->map(neat::MapMode::Read);
const float* d = static_cast<const float*>(m.data);
for (int64_t i = 0; i < boxes.shape[0]; ++i) {
  const float* r = d + i * 6;                     // x1 y1 x2 y2 score class_id
  const int cls = static_cast<int>(r[5]);
  const char* name = (cls == 0) ? "person" : (cls == 27) ? "tie" : "?";
  std::printf("%-8s %.2f  [%4.0f %4.0f %4.0f %4.0f]\n", name, r[4], r[0], r[1], r[2], r[3]);
}
In Python the decoded tensor reads as an [N, 6] NumPy array via to_numpy(). In C++ you map the tensor and read the floats. The model emits COCO class IDs; mapping them to display names is on the application.
Full program
Create the files in your project directory, then build and run.
Create CMakeLists.txt and main.cpp:
cmake_minimum_required(VERSION 3.16)
project(sima_neat_app LANGUAGES CXX)

set(CMAKE_CXX_STANDARD 20)
set(CMAKE_CXX_STANDARD_REQUIRED ON)
set(CMAKE_CXX_EXTENSIONS OFF)

# Supports both DevKit/native installs (system paths) and
# cross builds with SYSROOT exported (SDK sysroot paths).
if(DEFINED ENV{SYSROOT} AND NOT "$ENV{SYSROOT}" STREQUAL "")
  list(APPEND CMAKE_PREFIX_PATH
    "$ENV{SYSROOT}/usr"
    "$ENV{SYSROOT}/usr/lib"
    "$ENV{SYSROOT}/usr/lib/aarch64-linux-gnu"
  )
endif()

find_package(SimaNeat REQUIRED CONFIG)
find_package(PkgConfig REQUIRED)
pkg_check_modules(OPENCV REQUIRED IMPORTED_TARGET opencv4)

add_executable(sima_neat_app main.cpp)
target_link_libraries(sima_neat_app
  PRIVATE
    SimaNeat::sima_neat
    PkgConfig::OPENCV
)
The two highlighted lines are what link your app to Neat: find_package(SimaNeat REQUIRED CONFIG) finds the installed Neat package (via SimaNeatConfig.cmake), and target_link_libraries(sima_neat_app PRIVATE SimaNeat::sima_neat ...) links against it — the imported SimaNeat::sima_neat target propagates Neat's include directories and transitive dependencies automatically, so no manual include/library paths are needed. (PkgConfig::OPENCV is only required because this app uses OpenCV to load images.)
#include "neat.h"

#include <opencv2/imgcodecs.hpp>
#include <opencv2/imgproc.hpp>

#include <cstdint>
#include <cstdio>
#include <stdexcept>

namespace neat = simaai::neat;

neat::Model::Options yolo_model_options() {
  neat::Model::Options opt;
  opt.preprocess.kind   = neat::InputKind::Image;
  opt.preprocess.preset = neat::NormalizePreset::COCO_YOLO;
  opt.decode_type       = neat::BoxDecodeType::YoloV8;
  opt.score_threshold   = 0.25f;
  opt.nms_iou_threshold = 0.45f;
  opt.top_k             = 100;
  return opt;
}

int main() {
  cv::Mat bgr = cv::imread("assets/tutorial_sample_image.png");
  if (bgr.empty())
    throw std::runtime_error("failed to read assets/tutorial_sample_image.png");
  cv::Mat rgb;
  cv::cvtColor(bgr, rgb, cv::COLOR_BGR2RGB);

  neat::Model model("assets/yolo_v8s_mpk.tar.gz", yolo_model_options());
  neat::Tensor input = neat::from_cv_mat(rgb, neat::ImageSpec::PixelFormat::RGB);

  // Compose the model into a Graph application: image -> model -> detections.
  neat::Graph graph("hello_neat_app");
  graph.add(neat::nodes::Input("image"));
  graph.add(model);
  graph.add(neat::nodes::Output("detections"));

  // Build the app, push the image into the named input, pull the named output.
  neat::Run run = graph.build();
  run.push("image", neat::TensorList{input});
  neat::TensorList outputs = run.pull_tensors("detections");

  neat::TensorList decoded = neat::decode_bbox(outputs);
  const neat::Tensor& boxes = decoded.front();      // [num_detections, 6] float32
  auto m = boxes.storage->map(neat::MapMode::Read);
  const float* d = static_cast<const float*>(m.data);
  for (int64_t i = 0; i < boxes.shape[0]; ++i) {
    const float* r = d + i * 6;                     // x1 y1 x2 y2 score class_id
    const int cls = static_cast<int>(r[5]);
    const char* name = (cls == 0) ? "person" : (cls == 27) ? "tie" : "?";
    std::printf("%-8s %.2f  [%4.0f %4.0f %4.0f %4.0f]\n", name, r[4], r[0], r[1], r[2], r[3]);
  }
  std::printf("[OK] Graph app completed\n");
  return 0;
}
Build:
cmake -S . -B build -DCMAKE_BUILD_TYPE=Release
cmake --build build -j
Run:
- On the DevKit
./build/sima_neat_app
- On the Neat SDK from host
dk build/sima_neat_app
You should see one line per detection, then:
[OK] Graph app completed
What Neat assembled

The APIs map directly to that shape:
Graphholds the application pipeline;graph.add(...)appends each step in order.- The named input and output become the runtime endpoints:
run.push("image", ...)andrun.pull_tensors("detections"). Modelis the same fragment you would call directly withModel.run; here it runs as one node inside the app.
Next steps
For deeper graph composition, continue with the Graph programming model.
From there, continue with broader SiMa Neat learning resources:
- Learn the core programming model, which explains the main Neat concepts such as graphs, models, pipeline stages, and graph execution.
- Follow the tutorials, which walk through specific concepts and workflows step by step.
- Explore curated applications on the apps portal, with source code in the apps repository on GitHub.